
Check out: How to fill in acrylic nails at home with acrylic powder and 4 other ways to fill in acrylic nails effortlessly
What Is A Nail Fill?
A nail fill is a type of manicure that repairs the appearance of nails. It involves filling the area between the cuticle and the edge of the acrylic nail where the nail has been broken or chipped. You can use a special type of material, such as acrylic, gel, or fibreglass, to fill in the gaps.
The material is then shaped and polished to match the natural nail. A nail fill can extend the nail’s length or provide a more even surface. Lots of nail-biters apply acrylics to disguise their bitten fingernails.
In this tutorial, we’ll show you how you can easily fill in acrylic nails with acrylic powder. Or, if you are not having acrylic nail supply at hand, what alternate can be used to fill in.
How to Fill in Acrylic Nails at home using Acrylic Powder
Ensure you have all the supplies before you go for a nail infill. Then, follow this fill method.
Step 1: Remove Old Nail Paint
- Use cotton balls dipped in acetone-free nail Paint Remover.
- Avoid acetone-based removers to prevent acrylic damage.
- Clean nails with wipes or wash hands (avoid soaking).
- Ensure a clean surface to prevent infections.
Note:
Use non-acetone nail paint remover.
Clean your nails thoroughly to prevent infections.
Step 2: Buffing the Excessive and Lifted Acrylic
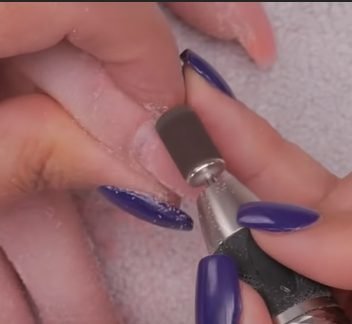
- When filling acrylic nails, use a Bit to take off gel polish and remove cuticles with cuticle remover.
- Remove the lifted acrylic from the cuticle area resulting from nail growth.
- Use a rough nail buffer, and gradually switch to higher grits. You can start with 180 grit, then switch to 240 grit fill when the nail is thin enough.
- Buff until the surface is smooth from acrylic to natural nail.
- Don’t buff natural nail beds or areas without acrylic.
- Buff the rough natural nail bed gently if needed.
Note:
Remove the lifted acrylic along the nail edges.
Gradually buff to achieve a smooth surface.
Avoid buffing the natural nail bed or areas without acrylic
Step 3: Using Dehydrator and Nail Primer

- Before starting the priming process, clean the nails and remove excess cuticles.
- Apply nail dehydrator to a natural nail plate using lint-free pad wipes.
- Apply nail primer to the natural nail gap.
- If you are using a gel primer, let it dry after application.
- Primer protects natural nails from acrylic chemicals.
Note:
Apply dehydrator and nail primer to natural nails.
Apply 2–3 coats of nail primer for protection.
Don’t apply primer to the skin or cuticles.
Step 4: Prepare and apply the Acrylic Mixture to Fill the Gap
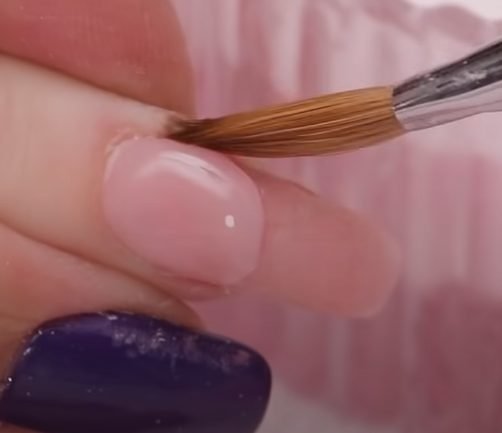
- Mix the acrylic powder and liquid (monomer) in the glass dish.
- Form a bead mixture of acrylic on a brush.
- Apply evenly to the gap between the cuticle and acrylic edge using a nail brush to accurately fill the gap between the acrylic nail edge and cuticle area.
- Keep your finger down to prevent flooding the cuticles.
- Fill the gap without flooding to reduce lifting.
- Apply 1-2 coats of acrylic mixture for a smooth base.
- Spread the acrylic mixture evenly across the entire nail.
Note:
Mix acrylic powder and liquid to create a bead.
Apply the acrylic mixture evenly to fill the nail edges and gaps.
Keep your finger downward in the acrylic nail-filling process to avoid flooding the cuticles.
Step 5: Dry, File and Buffer
- File the nail length if desired.
- The buffing process is needed to ensure acrylic nails are no longer lifted.
- Use a rough nail buffer or nail drill to buff the lifted acrylic edge.
- Keep buffing to create a flat surface between the acrylic edge and the natural nail.
Note:
Allow the acrylic to dry completely.
File nails if needed, and then buffer for a smooth finish.
Step 6: Finally, Paint the Nails
KISS Acrylic Nail Fill Kit

This acrylic nail filler kit is a true gem, equipped with all the essential materials to effortlessly rejuvenate your acrylic nails at the comfort of your home.You can buy a nail fill kit at a beauty supply store or get the tools you need to do it yourself. You can check its star rating to decide if it’s the right product for your desired outcome. Usually, these acrylic nail kits are inexpensive and come with all the necessary tools to infill the nails. If you prefer not to buy any nail file kit then buy separet acrylic material to get started. Check out the current price of this acrylic set.
How to fill in acrylic nails without acrylics
If you do not have acrylic supplies at hand, there are some alternate methods that you can use to fill in acrylic nails at home.
- Gel nail polish
- Polygel
- Dip powder
- Regular nail polish
1. Using Acrylics to Fill Gel Nails
Do you wonder if acrylics can fill gel nails? The notion is attractive, but there are crucial considerations. The details:
Compatibility Matters:
Gel nails and acrylics have different qualities. Acrylic can fill gel nail gaps, theoretically.
Temporary Strategy:
This is a temporary workaround when gel nails filling supplies are unavailable. It’s a temporary fix till maintenance can be done.
Structural Considerations:
Acrylic and gel nails have different weights and compositions. When combining these materials, weight can alter the structural integrity of your natural nail bed.
A Word of Caution:
Combining acrylic and gel might stretch the nail plate. Consequently, these materials are heavy and cause damage if mishandled.
The Optimal Practice:
- Follow the best guidelines for nail art to keep it safe and healthy.
- Fill acrylic nails with acrylic and gel nails with gel.
Please keep in mind that while gel nail fill-in can be a temporary fix, using products made specifically for acrylic nail filling, such as Polygel or Dip Powder, frequently yields the best results in terms of durability and maintenance.
2. Can you fill acrylic nails with polygel?
Using Polygel to Fill Acrylic Nails
Polygel, a newer nail product known for its durability, offers a fantastic alternative for maintaining acrylic nails.
Its user-friendly nature, especially for beginners, yields a smooth finish akin to traditional acrylics. Here’s how to use Polygel to fill in acrylic nails:
Preparation:
- Begin by prepping your nails:
- Remove nail polish and gently push back the cuticles.
- File away any lifted acrylics and excess length.
- Cleanse nails with rubbing alcohol or acetone.
- Apply a coat of dehydrator followed by nail primer, for optimal adhesion.
Polygel Application:
Dispense Polygel from the bottle and apply it to the gaps in your acrylic nails.
Gradually layer more Polygel to cover the acrylic surface, sculpting it to your desired shape.
Curing: Once your nails are shaped, cure them under a UV LED lamp for around 60 seconds.
Final Steps: After curing, Refine your nails by filing them to your preferred shape.
With your nails looking their best, apply your chosen nail polish
Pros and Cons of Using Polygel for Acrylic Infill:
Pros
- Polygel’s key advantage lies in its user-friendly nature
- Polygel is premade, eliminating the need to achieve the precise liquid-to-powder ratio as with acrylic.
- It only cures under UV LED light, allowing ample time to perfect your nail shape.
Cons
- Acrylic nails tend to be heavier compared to Polygel.
- This difference in weight can create an imbalance, particularly as the tips (mostly acrylic) carry more weight than the base.
- The uneven weight distribution can lead to issues such as lifting due to the heavier tips.
Polygel provides a convenient and accessible way to fill in acrylic nails.
Its simplified application process and impressive durability make it a viable choice for maintaining acrylic nails.
However, it’s crucial to consider the potential weight imbalance issue, especially for long-term nail health and longevity.
Related Topic: 2023’s Hottest Polygel Types, Forms, and Unbeatable Uses
Related Topic: 4 Methods: How to Apply Polygel Nails at Home
Related Topic: How to Remove Polygel Nails Easily without any Damage
3. Fill or refill acrylic nails with dip powder
Dip Powder, a manicure system resembling acrylic but without the use of acrylic liquid, offers an alternative way to refill or fill in acrylic nails.
Instead of liquid, Dip Powder employs a base (bonder) to secure the powder and a sealant for curing and hardening.
About Dip Powder: Dip Powder involves a highly pigmented powder that doesn’t require acrylic liquid. It employs a base and a sealant to achieve a lasting finish.
However, it’s important to note that while Dip Powder can serve as a substitute, it might not be as durable as acrylic due to its lighter nature, potentially leading to an imbalance and lifting issues.
How to Fill in Acrylic Nails with Dip Powder:
1. Preparation:
- Begin by removing nail polish, filing it off, or using a non-acetone nail polish remover.
- Prepare your nails by pushing back the cuticles and filing away any lifted acrylic or extra length.
2. Nail Cleansing:
- Thoroughly clean your nails by wiping them with either acetone or rubbing alcohol.
3. Apply Dehydrator and Primer:
- Apply dehydrator and nail primer to the exposed areas of your nails.
4. Dip Powder Application:
- Apply a dip base coat to the gaps in your acrylic nails.
- Dip your nails into the dip powder immediately after applying the base, focusing on the gap to ensure even coverage.
5. Full Nail Coverage:
- Dip your nails again in the powder after applying the dip base to the whole nail..
- Repeat the process until you achieve the desired level of opacity.
6. Sealing and Buffing:
- Apply the dip activator (sealant) once your nails have the desired appearance.
- Buff your nails using a fine, grit nail file.
7. Finishing Touches:
Finish by applying a top coat. If you didn’t use a colored dip powder, apply nail polish before the top coat for a polished look.
Related Topic: How to fill Dip Powder Nails
Recommended Dip Powder Kit: Kiara Sky’s Dip Powder Kit is highly recommended for achieving professional results.
Using Dip Powder for acrylic nail refills or fill-ins offers an innovative approach, but be mindful of the potential balance issues associated with its lighter weight.
As with any nail enhancement process, prioritize nail health and proper technique for optimal results.
4. Using Regular Nail Paint to Cover Acrylic Nail Growth Gap:
While regular nail polish can temporarily conceal the growth gap on acrylic nails, it’s not an ideal choice for proper filling.
The thin consistency of nail paint makes it ill-suited as a substantial fill-in; its primary function is offering surface-level camouflage.
However, there is a secure workaround that looks wonderful for hiding the grown-out area of acrylic nails: using glitter nail polish. Glittery nail varnish sometimes works great to fill in grown-out acrylic nails, and beauty enthusiasts can rely on this quick fix.
Pros and Cons of using nail paint to fill in acrylic nail
Pros
- regular nail paint comes in variety of colors and easy to apply
- No equipments like LED lamp or UV light is required.
- Easy to remove
Cons
- The durability of regular nail paint is limited
- Lacks the thickness required for effective gap filling.
- Wears off quickly. It chips fast, so its covering may not stay long.
Related topic: Gel Nail Polish vs. Regular: What is the Difference?
Can you refill shellac nails?
- You can perform refills on shellac nails to address gaps and lift the nail structure.
- If you have shellac over an acrylic base, the refilling process is similar to infilling acrylic nails, where you address the gaps caused by the growth.
- However, when refilling shellac nails, the coating must be removed before infilling. This involves removing the shellac, addressing the gaps, and repainting the nails.
- Shellac is a robust nail coating, so manually buffing it down can be time-consuming. To expedite the process, consider using an electric drill.
Can you change the color of your nails when getting a fill?
Yes, you can change the nail color of your nails when getting a fill. This is a great way to switch up your look and keep it fresh. When you go to the salon for a fill, you can ask your nail technician to change your nail color. They will remove the old color and apply the new one. Depending on the type of polish used, the new color may last up to two weeks.
During a fill, can you get your acrylic nails cut shorter?
Yes, it is possible to get acrylic nails shortened during a fill. This process is called a ‘fill-in’ and involves filing down the existing acrylic and adding more acrylic to the nail to extend it and fill in any gaps. It is important to note that if your nails have grown too long, removing some of the existing acrylics may be necessary before adding more. Additionally, speaking to your nail tec.
How Often Do You Need Fill-Ins for Acrylic Nails?
Acrylic nails typically require fill-ins every 2-3 weeks. This timeline depends on how quickly your nails grow and how well you care for them. To ensure your nails look their best, keeping up with regular fill-ins and maintenance is importantRemember that the nail grows from the nail root, which is under the cuticle.; if you wait too long, the acrylics can start to lift and chip, damaging your natural nails.
Why You Need Acrylic Fill-Ins
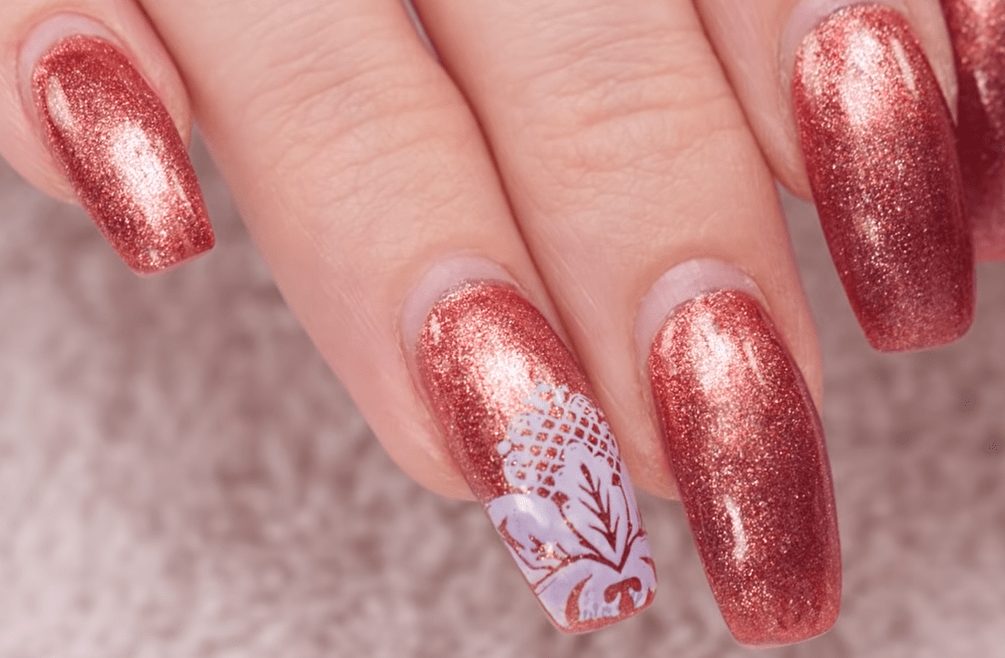
Having regular infills done is the most typical form of acrylic nail maintenance activity. Acrylic backfill helps nails by realigning smile lines. It helps protect the natural nail from the outside world and makes the manicure last longer.Additionally, acrylic fill-in can create various nail designs, from simple French tips to intricate patterns.
How long does an acrylic nail fill-in take?
An acrylic nail fill-in typically takes between 30 and 45 minutes, depending on the design’s complexity and the technician’s skill.
Before the fill-in, the technician will assess the condition of the existing nail gap and may need to do some preparation work, such as filing and trimming the nails. This could add additional time to the process. After the fill-in is complete, the technician will apply a topcoat and allow the nails to dry, usually taking about 10 minutes.
Does an infill damage your nails?
No, an infill does not damage your nails. An infill is a process of filling in the nail gaps between your nail extensions and your natural nail plate. It helps your extensions keep their shape and keep them neat and well-kept.An infill is a safe and effective way to keep your nails looking beautiful and healthy.
The good thing is that you may use any formula you choose, whether you’re a gel manicure fan or normally go with regular old polish.
When you get an infill, can you change the color and style of your nails?
Yes, you can change your nail color and nail design to coffin nails, french nails, or almond nail shapes. When getting an infill. The process is the same as when getting a full set of acrylic nails. Your nail technician will remove the existing nails and apply a new set with your chosen color and design. Depending on the complexity of the design, this may take a bit longer than a regular infill.
Cost of acrylic infill or refills
The cost of acrylic infill or refills depends on factors such as the type of acrylics used, the size of the nail gap needing to be filled, and the complexity of the design. Generally, acrylic infills or refills range from $2 to $20 per nail, with more intricate designs costing more. Prices may also vary depending on the nail salons. Some nail salons also provide packages with discounts for frequent visitors.
How much a fill-in for nails at the nail salons depends on the following:
The cost of a fill-in for nails at the nail salons will depend on several factors, such as the type of nail service being provided, the length of the nails, the complexity of the design, and the technician’s experience level. Generally, a basic fill-in will cost between $20 and $45, while more complex designs and full acrylic nail applications may cost more. Additionally, the service’s cost may vary depending on the salon’s location and pricing policy.
How many times can you get your nails filled?
It depends on the type of manicure, nail design, and accessories you get. Generally, you can get your nails filled every 2-3 weeks for a basic acrylic nail application. For gel nails, you can get your nails filled every 3–4 weeks. You can get acrylic nails filled every 4-6 weeks if you are taking great care of your current acrylic set.
You may refill your acrylics and wear them for as long as you want instead of wasting time and money filling in natural nail growth gaps.
It is important to note that the frequency of getting your nail enhancements filled may vary depending on the type of manicure you are getting and the condition of your nails and nail gaps.
Number of acrylic nail infills needed before a complete set replacement would depend on the following:
The number of acrylic infills before a complete set replacement will depend on the condition of your nails, the type of manicure you are getting, and the complexity of the design. If your nails are in good condition and the design is simple, you may be able to get up to 8 infills before needing a complete set replacement. If you want to avoid using acrylic, opt for a gel polish fill-in instead. This will provide a longer-lasting and more natural-looking manicure. You can also use a combination of gel polish and acrylic for a more durable and stylish look.
Conclusion
While regular nail paint can serve as a short-term measure to conceal the growth gap on acrylic nails, it’s important to recognize its limitations. For a more comprehensive and durable solution, consider using proper acrylic nail fill-in techniques, such as acrylic powder, Polygel, or dip powder. These methods are meant to give you results that last longer and keep your acrylic nails in good shape.