
Have you just noticed a cracked acrylic nail? Then you must be looking for an easy way to fix cracked acrylic nails at home.
Luckily, I have discovered some proven ways to repair cracked acrylic nails, gel nail, and also natural nails without much effort that I’ll share with you in this blog post.
Let’s face it! A broken nail after putting all your effort into placing it is more traumatising than having your nails done. You will always be proud of your appearance when you have clean and fresh nails. It is natural to have broken nails. You can have long, cute nails if your nail style needs spice.
Let’s talk about How to Fix Broken Nails or Acrylic Nails at home to help you get back on track with your fashion and self-confidence.
But before diving deep, let me show you the right way to identify damaged acrylic nails.
The right method to identify a cracked acrylic nail
Common symptoms of a cracked or broken acrylic nail
- If the acrylic nail has broken horizontally, you’ll see a horizontal line splitting the nail into two parts.
- The acrylic will start lifting at the edges.
- you can feel sharp pain around the nail edges
- You’ll notice uneven spots or bumps on your nails.
- The cracked acrylic nail might turn a different color, either yellow or even black.
- The damaged nail may be highly sensitive to temperature changes.
- Swelling, redness, and sensitivity of the area around the ruptured nail may occur.
- The trapped material or germs might cause itching or irritation. If moisture or germs are trapped, the result might be an awful odor.
What are the causes of broken nails?
There could be several causes, including stress, wear, tear, or nutritional deficiencies. People, however, tend to refer to these broken nails as split nails instead. Working with split nails is a considerable challenge, especially if you are using your hands.
Acrylic manicures are a popular way to improve the look of nails because they last a long time, and you can use them in many ways. But even though they are strong, they are not unbreakable and break often. Knowing what could cause acrylic nails to fail can help keep your nail extensions healthy and beautiful.
1. inaccurate nail preparation:
You must be an expert nail technician to apply acrylics correctly. Too much nail glue, the wrong nail removal techniques, or poor nail preparation at the nail salon can lead to weak adhesion and broken nails.
2. Overextending Nails:
Long Acrylics may look beautiful but are likelier to break. Especially when doing nail art or everyday things. A nail technician can help people find the right length based on their lifestyles.
3. Accidental Impact:
High-impact activities or accidentally slamming nails against hard surfaces can result in sudden nail breaks.
4. Weak Nail Structure:
Poor health conditions like vitamin deficiency or fungal infections can weaken the natural nail beds beneath acrylics, contributing to nail breakage. You can use a good quality nail strengthener to nourish your nails.
5. Moisture Intrusion:
Long-term exposure to water or too much nail serum can cause the nails to grow and contract, resulting in nail breakage.
7. Improper Removal:
Removing acrylics at home without professional help, like using a nail polish remover, can lead to beauty disasters, like broken nails.
8. Infection:
Nail glues or monomer liquid can pass the infection if not cleaned properly. It can cause swelling and infection, which can cause the nail to break.

How can you fix acrylic nails at home?
Broken acrylic nails are a significant source of frustration among many beauty woes. To avoid making the issue worse, repairing or removing anything that might catch on it quickly is important.
Even though fixing a broken nail or acrylic nail can be painful and frustrating, finding ways to improve the situation is not difficult. If you do not wish to spend money on getting your nail fixed at the salon, you can opt for a home acrylic nail repair. There are plenty of options to get your nails repaired at home without visiting any emergency room or doctor.
You must always take precautionary measures to prevent damage to your natural nails or the growth of fungus and bacteria under your acrylics and nails.
What to do with Broken Acrylic Nails:
If an acrylic nail is broken, you cannot fix it unless you remove it. It could result from accidental involvement in finger trauma resulting in severe nail bed injury.
First, you must get a painkiller and an ice pack, as broken acrylic nails are painful to deal with. Prevent all possible injuries and infections by doing this. When doing this procedure, you must remove the acrylic nail entirely.
Severe breakage can harm the nail bed and nail matrix responsible for nail cell production. Moreover, if you break or rip your natural nail, fungi and bacteria will enter the wound, infect your nail matrix and cause further damage.
You should first clean your nails and the affected area with soap and water. Then, for safety, wash your hands with alcohol or use a skin disinfectant afterward. Getting an acrylic nail kit at home is better to quickly fix the broken nail before visiting any nail salon.
What to do with Cracked Acrylic Nails:
In contrast, cracked acrylic nails differ from broken ones. It is best to trim and file your acrylic nails close to the crack if the acrylic is damaged or broken, yet your nails are fine.
Vicki Peters, NAILS Magazine Show manager cum’ nail technician, has a simple formula. She states that you can fix a stress area crack in an acrylic nail without removing all the product. However, it will only work if it is less than halfway across.
You can use acetone to remove the acrylic from the crack if it’s under the free edge. It won’t look pretty, but this is a friendly reminder to be cautious since acetone stings when you pour it accidentally.
After this, you can apply the nail form to your acrylic nails and extend them to your desired length and shape.
Repair them with Nail Glue:
The process of repairing a broken nail isn’t tricky at all. You can use a household super glue called nail glue or any fingernail glue we use to attach fake nails. If the nail breaking isn’t hurting or causing any soreness, this method will work best. Naturally, you can attach your nails with this type of glue without any hassle. You can fix a broken nail in three simple steps.
- Buff the cracks of your nails gently.
- I suggest using alcohol to clean the mating surfaces where you attach the nails before applying nail glue. This ensures that no remaining gems could potentially cause an infection.
- Make sure you don’t go beyond the crack and worsen the situation. You might damage your nails or get infected due to nail glue overflowing.
- Put on two to three layers of nail glue or super glue, and clean the surrounding area of the nail with a cuticle stick so the glue doesn’t stick to the skin. Then wait a few minutes for it to dry.
- After that, it can be painted with the nail polish of your choice.
- Though temporary, you can use the nail to file and trim the crack until your natural nails are long enough.
Fix the Broken nail with gel nail polish and silk wrap :
People who do not know how to heal their broken nails can use silk wrap and gel. Using this silk wrap method, you can work things out more permanently than using a tea bag or glue. If a nail is about to crack completely, this silk wrap nail repair procedure works wonderfully to fix a fully cracked nail. I found a fully functional starter kit at Amazon that you’ll find suitable too. We’ll use a kiss Fix-It-up Silk wrap repair kit for this quick silk nail wrap tutorial. This nail set will give you all the tools to fix and strengthen your nails.
Silk Wrap Nail Repair Tutorial
- Choose a silk strip the same width as the broken nail and buff it to remove dirt and oils.
- Trim the silk strip to size, remove the plastic lining, and apply it to a clean, unpolished nail.
- Apply glue with a paintbrush to the silk strip, avoiding the cuticles. Under the glue, the strip will turn transparent.
- Dip the nail surface-side down into the acrylic dip while the adhesive is still wet, and allow it to cure for a few minutes.
- Use a fan brush to remove extra powder and achieve a tidy finish once the powder has dried.
- Seven to ten minutes later, apply a final layer of glue and allow it to harden completely.
- You can now apply varnish after filing the nails to the desired shape or apply an accent nail with a different style. Consider employing Londontown’s Invisible Crown, a lovely neutral pink that conceals the break effectively. Use their Protective Top Coat to prolong the color’s durability.
Follow these steps for an effective silk paper nail repair and quickly mend broken nails.
Mend Cracked nails with nail Dip powder
Have you heard you can cure your broken nail with nail dip powder? If you haven’t considered that, you should know the following procedures and materials for fixing them as quickly as possible. The steps are listed below. For this dip powder nail repair tutorial, we’ll be using one of my favorite Lavender violet dip powder set that is an absolute game changer for me.
Lavender Violets
Dip Powder Gel Liquid Set

- 3 jars of acrylic powder- clear, white, pink
- 4 bottles Top coat, activator, base coat, brush saver
- Mini nail file
- 2 brushes
- 2 bamboo pushers
- Let’s start by putting some base coat on the broken part of the nail plate. The base is a kind of resin that can serve the purpose of glue.
- Now with the help of a tweezer, try to attach the broken nail piece to the acrylic tip.
- Then wait for a while until the glue dries.
- Next, apply the base only on the tip of the nail and pour the clear dip powder on it.
- Then let it dry for about 15 to 30 seconds.
- Remove any excess powder and apply the second coat of base coat on half of the nail.
- Now again, pour clear dip powder on the base coat and let it dry
- Once dry, apply the third layer of base coat on the entire nail and wait 15 seconds.
- Tap off any excess powder or use a soft brush to tap off the powder
- Then apply a generous amount of activator when the nail has completely dried
- The surface may look bumpy, so to even out the nail surface, we’ll use buffer or a nail filer to fill it until it becomes completely smooth.
- Remove any excess dust from the nail using alcohol when you have buffed the nail.
- At this point, you can apply cuticle oil to moisturize the nails or put some nail paint you choose.
Tea bag method to fix a broken acrylic nail
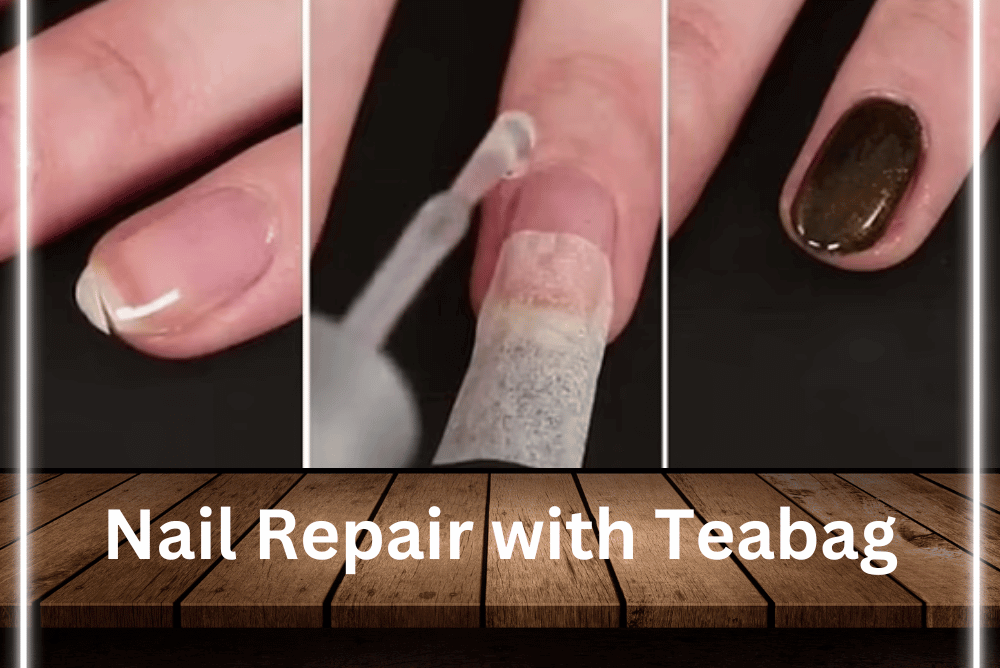
Teabags aren’t only good for healing your feelings and can also mend your broken nails. The tea bag is a cheap repair technique to fix a broken acrylic nail, whether you believe it or not.
For a tea bag nail repair without nail glue, follow these steps to get a natural nail repair.
- First, ensure that your nails are clean and that there’s no polish or base coat on them.
- To fix a broken nail, start by cutting a tea bag and shaping it to fit the width of the affected area.
- Now put this patch on the broken area to test your fit.
- After that, apply a coat of clear white polish, and while it’s wet, place this patch on the nail.
- This tea bag patch, made of cloth, will become invisible upon contact with your nail.
- Put a single coat of clear nail polish on it again and let it dry completely.
- Use a buffer to gently smooth out rough areas to achieve a smooth nail surface.
- You can now paint your nails with your desired color polish.
You should use tea bags only if your nails are partially split and have a few cracks. Using a tea bag is also useful to fix a broken nail halfway down. Once the broken part has grown completely, you can safely cut it off.
Video tutorial :how to use tea bag to repair a broken nail
How to remove the teabag from the nail?
- You can remove the tea bag easily when your nail has healed completely.
- Soak your fingers in soapy water.
- Now gently peel off the tea bag, and use a soft nail buffer to soften it further.
- Now apply cuticle oil to keep it nourished
How long will a tea bag nail repair last?
The tea bag nail repair can last up to 2 weeks if taken great care during daily activities. Proper nail care is advised to prolong its longevity.