Acrylic nails replaced fiberglass nails as the most popular nail extension type in the late 80s. Since then, acrylic nails have emerged as the top artificial nail solution.
Fiberglass nail extensions extend nails to the tip.. They are another type of manicure technique and an alternative to acrylic nails and gel manicures.
Fibreglass nails are thin strands that attach to natural nail tips using resin glue. In addition, it’s worth noting that the application of fiberglass nail strips requires the use of glue for proper adhesion. After the glue hardens, the fiberglass bonds together. After the nails are dry, they are easy to shape and file.
In this article, I am gonna give you complete information regarding fiberglass nail wrap application and usage.
What Are Fiberglass Nail Wraps?
Fiberglass nail wraps are thin, flexible sheets made from woven fiberglass strands. They’re one of the safest nail enhancement products, designed to reinforce and protect your natural nails while providing a sturdy foundation for nail enhancements. These wraps act as a protective shield, providing extended nail repair to prevent chipping, splitting, and breaking of your nails.
Regarding different types of fiberglass nail wraps, there are two main options: precut wraps and roll wraps. Precut wraps are pre-sized to fit your nails, which saves you time and effort during application. On the other hand, roll wraps offer flexibility since you can cut them to your desired length and shape. They’re great if you have unique nail sizes or prefer a custom fit.
Some fiberglass nail wraps are self-adhesive, so you don’t need glue for application. These are super convenient and beginner-friendly, as they simplify the process. However, if you prefer more control over the adhesive, you can opt for non-adhesive wraps that require nail glue for attachment.
Fiberglass nail wraps come in various styles and finishes, allowing your creativity to run wild. Whether you prefer a natural look, French tips, or colorful designs, there’s a wrap to suit your taste. But both fiberglass and silk wrap are not common nail salon options.
Remember, fiberglass nail wraps are a popular nail extension method for those looking to strengthen and protect their natural nails while enjoying beautiful enhancements. There’s no denying that this manicure technique has been the preferred method for nail care for the last 4-5 decades. Also, ensure you have healthy nail beds and enamel because the fiberglass application process requires it.
Pros of Fiberglass Nail Wraps
- Fiberglass nail covers to protect your natural nails. They strengthen damaged nails and prevent chipping, splitting, and breakage.
- Fiberglass wraps are transparent or translucent, giving your nails a natural look. They are ideal for a delicate manicure.
- you can use these wraps with various nail enhancement techniques, such as gel polish, acrylic overlays, or even as a base for nail art.
- Flexibility: Lightweight and flexible fiberglass wraps are comfortable to wear. They fit snugly and move freely because they adjust to your nails.
- Quick Application: Applying fiberglass wraps is simple. Precut wraps or self-adhesive choices save time and give salon-quality results at home.
Cons of Fiberglass Nail Extensions
- Fiberglass nail wraps are easy to apply, but take practice to get the best results. The application procedure may require a few tries.
- Fiberglass wraps may need regular maintenance. To maintain your manicure, replace or repair damaged wraps.
- Limited Nail Art Options: Unlike other nail enhancement techniques, such as acrylic or gel extensions, fiberglass wraps can’t do detailed or 3D nail art. Transparent nails limit nail art options.
- Fiberglass nails might not be a good choice if you have a nail-biting problem or extremely damaged nails.
- Professional Removal: Removing fiberglass wraps can be more challenging than regular polish. You need to soak them in acetone which can cause drying.
- Fiberglass wraps can cause allergies in rare cases. Before using them, patch test or visit a dermatologist if you have skin sensitivities.
Which is Better: Silk Wrap Nails or Fiberglass Wrap Nails?
You have to make this decision based on your preferences. Most people find fiberglass to be more durable. For this reason, fiberglass extensions are a better substitute for acrylics and even dip powder nails.
The silk wrap nails have designs created by wrapping pieces of silk around the nails. Consider using silk wraps in acrylic nails for added strength and support instead of relying solely on natural nail coatings. Moreover, silk wrap nails are comparatively more breathable than acrylic or gel polish, providing great coverage for damaged nails. However, silk wrap tends to be more flexible, so you shouldn’t expect it to achieve any significant length.
Ultimately, the choice between fiberglass and silk wrap nails depends on your desired level of strength, flexibility and the specific nail enhancement techniques you prefer.
Fiberglass wraps may be the way to go if you prioritize strength and compatibility with other nail enhancements.
On the other hand, if flexibility, nail repair, or intricate nail art options are more important to you, silk wraps might be the better choice. It’s important to properly prep and care, no matter which type of wrap you choose,
Make sure to remove any existing polish and clean your nails thoroughly to avoid trapping dirt and bacteria under the wraps. Additionally, you should always use a nail file and buffer to gently shape and smooth the surface of your nails before application.
In what ways are fiberglass nails different from acrylic nails?
As a result of their thinness, fiberglass nails have a much more natural appearance than acrylic nails, acrylic powder, and gel nails. Also, fiberglass nails have been setting records on instagram as one of the most trending artificial nail techniques for quite some time now. Additionally, they also use on toenails. The downside of thin nails is that they are less durable than other types of enhancements, even if they look more natural.
A combination of polymers, such as powder, and monomers, like liquids that harden, create acrylic nails. The nails made from acrylic are thick and rigid, whereas those made from fiberglass are flexible and break up easily in water over time.
How long do fiberglass nails last?
How long fiberglass nails last depends on many things, like how you take care of your nails, what you do every day, and the quality of the products you use. Fiberglass nails last two to four weeks before requiring fixe or filled-in.
It’s important to remember that as your natural nails grow, the space between the cuticle and the fiberglass wrap will become more obvious. This is why regular maintenance, like filling in the new nail growth or putting on a new wrap, is needed to keep the manicure looking good and working well.
How well you care for your nails can also affect how long your fiberglass nails will last. Avoid putting them in harsh chemicals, too much water, or water for a long time, as these things can weaken the glue or make the wraps come off.
Are fiberglass nails safe?
The purpose of fiberglass wraps is to strengthen and protect your natural nails. However, remember that overusing any method to strengthen your nails can eventually weaken your natural nails. Maintaining healthy nails requires taking regular breaks between treatments. When handled with care and caution, fiberglass wrap nails can be just as safe as any other type of nail. Nail technicians and dermatologists are excellent resources for specialized information on nail care and nail health issues.
If you are uncomfortable with acrylics, dip powders, or gels, fiberglass will do the best for you. Because these are lighter in texture and do not require a UV light like gels.
It is one of the best alternatives to gels or acrylics. Its application process is super easy, and you won’t need UV lights to cure.
- Wipe and buff the nails – First, dry your hands gently. Remove any nail polish on your nails with a nail polish remover. Rub your nails with a buffer until they become rough.
In addition to removing the oil from the nails, a light buffing will prepare your nails for applying fiberglass. - Prep your nails – Now apply a thin layer of gel base coat followed by a hydrator and non-acidic primer as you normally do when providing gel-polish service. Please make sure that you spread the base coat gel evenly over the whole nail.
By doing so, you prevent staining the extension. After 30 seconds, you will have cured your nails, and then you can extend your nails with fiberglass. - Put fiberglass on – Afterward, apply a thin layer of gel color only to the half of the nail bed that is thick in consistency.
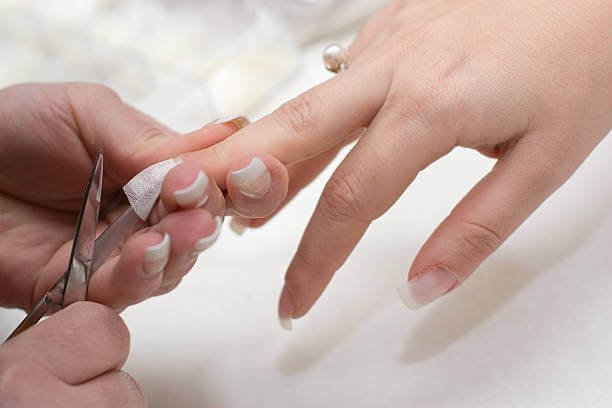
Once that’s done, you can adhere the fiberglass to the nail. Fiberglass will adhere well to the thick gel if you cover the whole natural nail bed with it; therefore, be sure to apply it entirely to the fingernail bed. - Form the fiberglass – Make a shape that resembles a nail with fiberglass over the nail. Ensure fiberglass doesn’t come into contact with the nail’s cuticle corner. Ensure that the nail has the same shape as a real nail.
The LED cure should take one minute, but you could also cure it at room temperature. The extra fiberglass on your nail should be cut off after curing according to your preferred size. The same fiberglass application process can be used for nail repairs.
Moreover, fiberglass and silk wraps are also great options for nail repairs. They are both quite thin and can be applied in a thin layer. This means that they can be used to extend the nail’s length and strengthen the nail plate. They can also be used to repair broken nails and strengthen weak nails.
It is easy to remove fiberglass nails at home, but the natural nails must be protected as well as the skin around them.
Here are the steps for removing fiberglass nails:
- Take off the nail polish – You should start by gently removing any nail polish from your fiberglass nails. In order to remove nail polish properly you have to dip your nails in a bowl filled with nail polish remover.
- Take a bowl and dip your nails into it – Make sure to use a glass or bowl. You can place pure acetone or nail polish remover in the bowl to completely dip your nails. Dip your nails for at least 3 minutes in the acetone bowl. Wipe them with cotton balls after they are removed. Be sure to remove the fiberglass.
Several times, repeat the process. You should never soak your fingers longer than three minutes in acetone each time, due to the risk of skin damage. - Use a buffer and file to buff the nail – To get a smooth nail bed, buff the whole nail surface, but do not overdo it. Buffing excessively can cause the natural nail bed to thin and prevent the nail from growing normally.
You can use any file you have. Reshape the tip of the nail with gentle pressure. Dry your hands off with a towel or napkin after you wash your hands. - Moisturizing is essential – Moisturizing is the last step of this procedure. The nail bed should be moisturized with cuticle oil. The cuticles and surrounding skin will be hydrated.
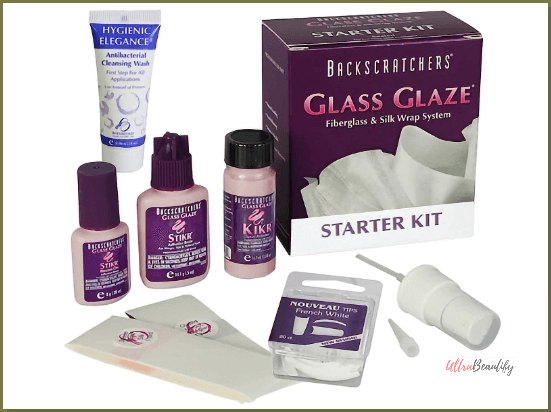
Fiberglass nail kit and accessories for beginners
The best fiberglass nail system I recommend for professionals and beginners to repair nail cracks and for nail tip extensions is Backscratchers Extreme Glass Glaze Fiberglass Starter Kit. It comes with self-adhesive nail wraps and fiberglass extensions. If you offer natural nail services at your salon, adding fiberglass nail repairs as a gel-polish service will be a great choice for your clients.